Window tint bubbles are one of the problems that can completely wreck the look of an otherwise pristine car, and in my experience, they usually mean that the whole tint job is about to go south. Sometimes it’s just small water pockets that disappear in 2 days, or maybe it’s a bad adhesive failure that gets progressively worse each week. The automotive tinting film market hit $7.59 billion in 2024, and it’s not surprising given how much drivers value the combination of a sharp-looking ride and keeping their interior cool.
The upside is that most bubble problems can be fixed with the right repair techniques if you catch them early enough. Professional installers say around 60% of bubble problems are actually caused by installation mistakes – not because the material itself is breaking down. A few basic methods can get your tint smooth again without having to pay for and go through a replacement. The best strategy depends on how big the bubbles are and how long they’ve been trapped under the film. You need to check if contamination or adhesive failure is behind the problem.
Here’s how to fix those bubbles without starting from scratch!
What Makes Your Window Tint Bubble
Window tint bubbles can show up for all kinds of different reasons, and the fix you need has to do with what caused them in the first place. Your tint doesn’t have to be old and ready for replacement just because you see 1 or 2 bubbles – the truth is a bit more involved than that.
Most bubble problems can be traced back to installation day. The installer might not even see it at the time. These contamination bubbles usually make themselves known either immediately or within those first few days after installation. What makes them easy to find is their irregular shape and their grainy, textured appearance – because there’s literally debris trapped underneath the film.
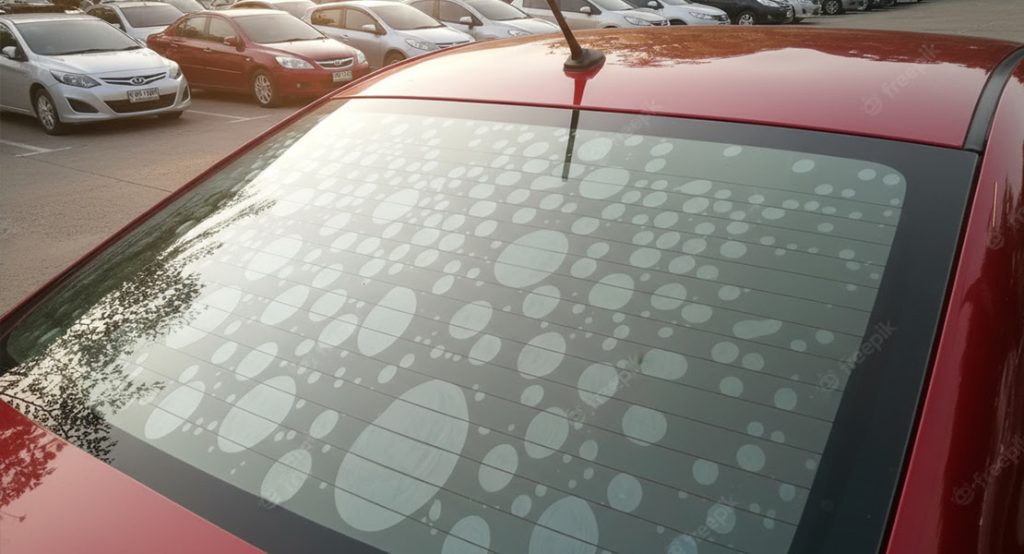
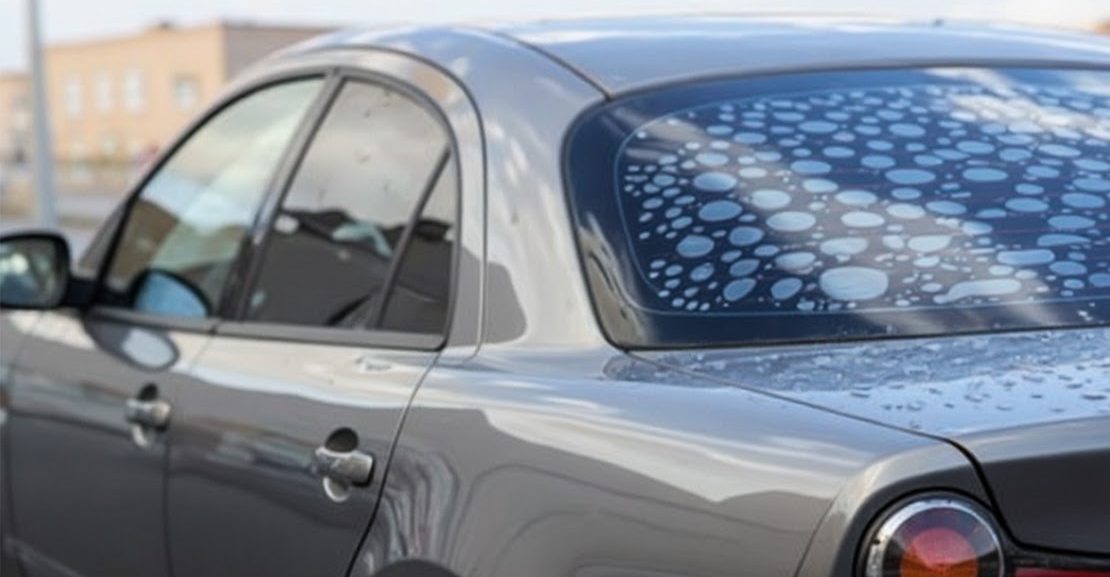
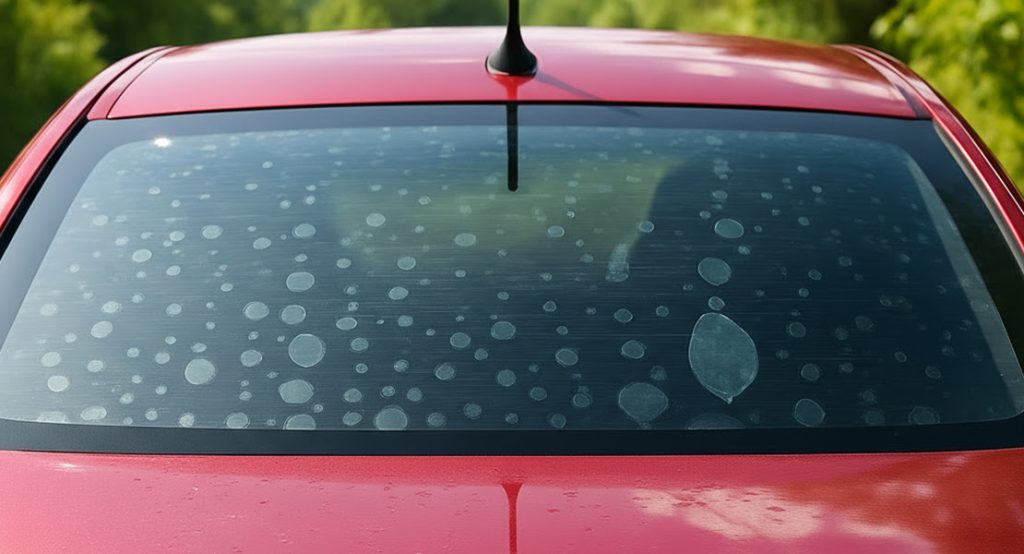
Temperature extremes are brutal on window tint, and the damage accumulates slowly over time. A car baking in direct sunlight all summer long, then sitting in frozen parking lots throughout winter, puts the tint through a cycle of expansion and contraction that slowly breaks down the adhesive bond between the tint film and your window glass. At some point, the adhesive just can’t hold on anymore and releases its grip in certain spots. Once the adhesive failure kicks in, the bubbles you’ll see are smooth and circular with clean, defined edges.
They’re very different from contamination bubbles because there’s no debris inside them – just air where the adhesive used to be. These particular bubbles might start out small – barely even visible. But they’ll slowly expand and multiply if you don’t fix the problem.
The appearance of your bubbles tells you exactly what went wrong. Contamination bubbles stay the same size and have a grainy texture inside them. Adhesive failure bubbles are completely smooth, and they usually either grow bigger or multiply into more bubbles nearby. You can tell if a repair will work or if replacement makes more sense.
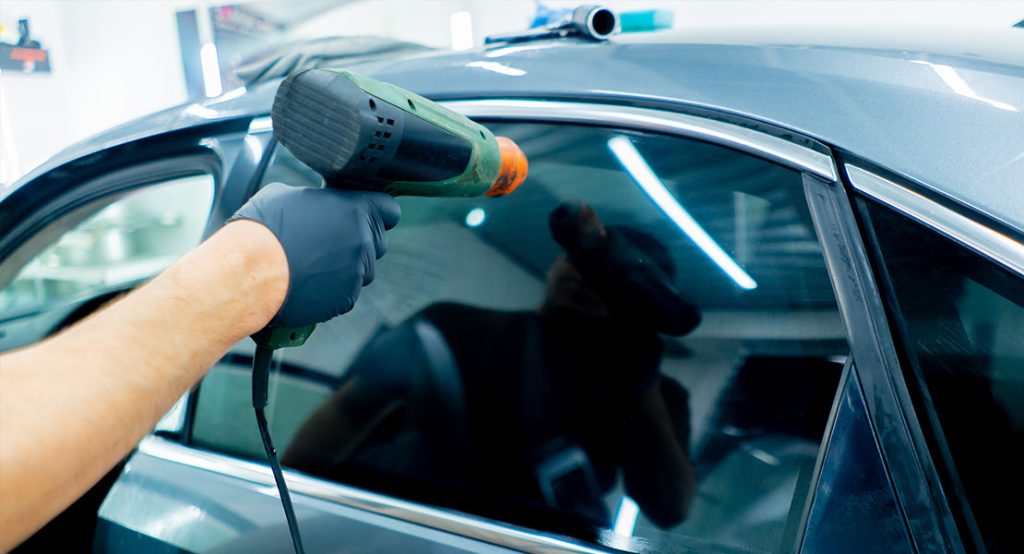
Fix Small Bubbles with Heat and Needle
Small bubbles under 1/4-inch wide can be fixed at home. But only if you address them soon enough. The window of opportunity is pretty narrow here – you have about 3 days from when the bubble first shows to fix it yourself. After that point, the adhesive layers will have already started to separate from one another, and at that stage, a professional is your only option.
First, you need a hair dryer on medium heat. Hold it about 6″ away from the bubble and warm up the area slowly. The film should feel just slightly soft to the touch – not hot but just warm and pliable. The temperature should be somewhere between 120°F and 140°F. Go any hotter than that and the film itself could start to warp or discolor.
The next step takes a steady hand and some patience. A fine needle works best, and you should insert it at about a 45-degree angle into the bubble. Try to make the absolute smallest puncture you can manage. Professional tinters will tell you that’s where most DIY attempts go wrong – DIYers get impatient and either push too hard or wiggle the needle around, and it leaves visible damage or causes the film to tear.
After you’ve made that small puncture, take a microfiber cloth and press down with firm pressure. Work from the center of the bubble toward the edges. The motion is like squeezing the last bit of toothpaste from a tube – steady pressure in one direction. Make small circular motions as you work and slowly push all that trapped air toward the needle hole you just created.
The film needs adequate time to cool down and re-bond to the glass correctly – it’s where I see homeowners make their biggest mistake. The bubble disappears, and they’ll immediately start touching the area or rolling the window down to check their work. Don’t do that! The adhesive needs at least 1 hour to form its bond with the glass, and any movement or touching during that time can undo all your careful work.
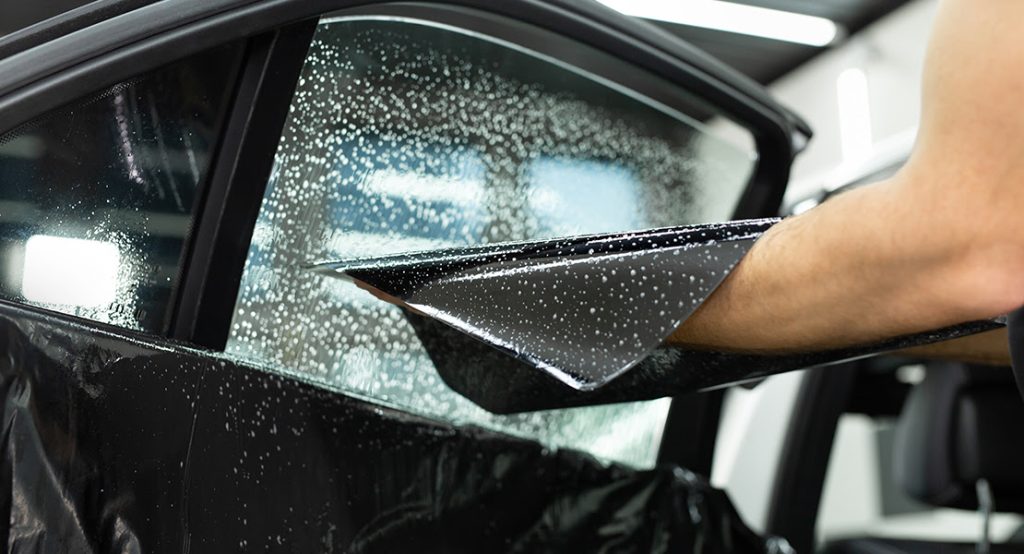
Use the Professional Soapy Water Method
The perfect solution calls for about 2 or 3 drops of baby shampoo per cup of distilled water. Tap water contains all sorts of minerals that can leave behind streaks that will show through the tint once everything dries. The soap solution helps to reactivate the adhesive just enough that it gets workable again and lets you smooth those bubbles out completely without creating any residue or film.
The center of each bubble should be your starting point each time, and from there you should move outward toward the edges. Use your squeegee the same way that a painter uses their brush on a wall – lots of overlapping strokes to get an even coverage. This stops the bubbles from sneaking their way into corners or along edges where they’ll be almost impossible to remove later. The whole process takes patience because you’re really just herding the little air pockets toward the nearest exit point instead of just pushing them around randomly and hoping for the best.
It’s especially effective during those first 48 hours after installation. At that point, the adhesive remains somewhat active and pliable. Once that window passes, the adhesive completely cures, and those bubbles become a lot more stubborn.
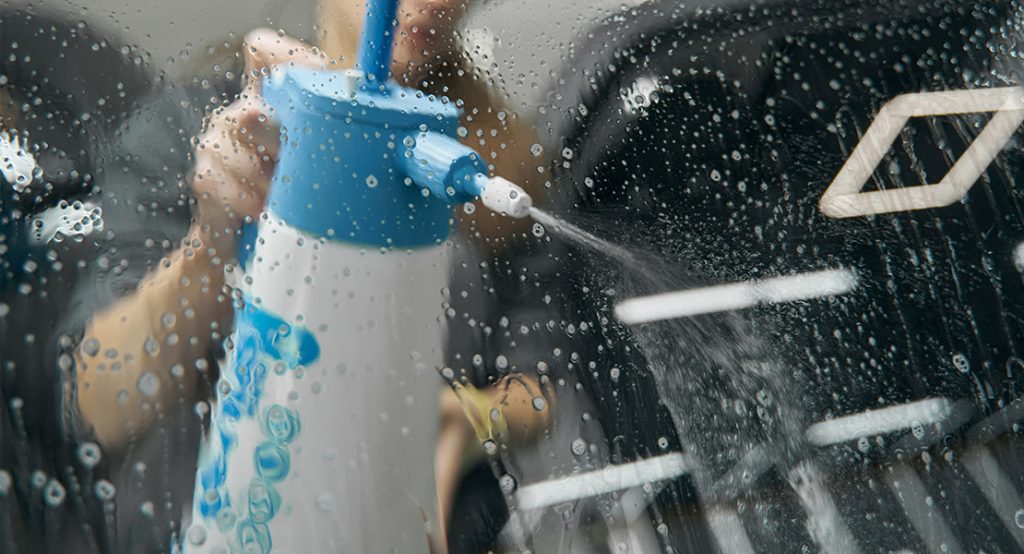
Water has to be handled carefully, though. Add too much, and the adhesive will start to break down, spread around, and leave you with these terrible, cloudy patches that are actually worse than the bubbles you started with. All you need is a very light mist of water. You want to get the surface damp enough for the adhesive to soften up again without drowning the whole area.
Professional tinting shops came up with it after years of dealing with customer complaints about their window film. It’s a much faster fix than what they used to do, and it saves everyone money since the shop doesn’t have to rip out all the old tint and start from scratch with a brand new installation.
Use Steam for Stubborn Bubbles
At some point, the gentle approach just isn’t going to cut it anymore. Even after all that work with the hair dryer, those bubbles might still be staring right back at you – and that’s when a steamer turns into your biggest help.
Steam operates on a very different principle than normal heat does. As a hair dryer blows hot air across the surface, steam actually manages to penetrate much deeper into those adhesive layers underneath the film. The combination of moisture and heat softens up the glue in ways that dry heat by itself just can’t achieve – and that’s what makes it so effective at fixing those really stubborn bubbles that just refuse to cooperate, no matter what else you try.
The technique does need a bit more careful work than other methods, though. The steamer nozzle needs to stay about 2-3 inches away from the window surface at all times. Bring it any closer and you could wind up with damage to the film or the window itself. Hold it steady at that distance for 30-60 seconds as you closely watch how the film responds. The film will start to soften slightly, and that’s just what you want – just make sure it doesn’t start to warp or distort.
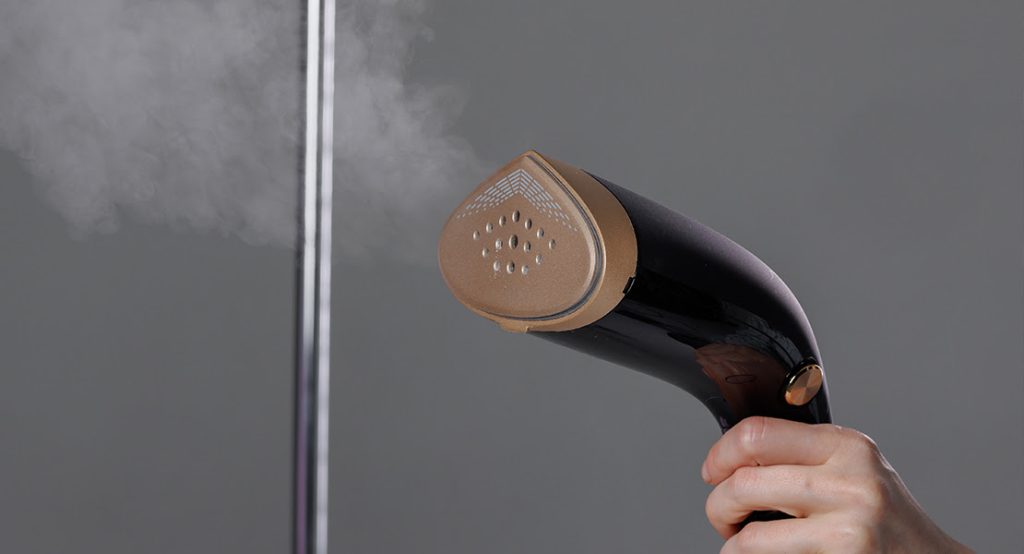
Auto detailers have figured out something interesting over the years – garment steamers actually perform way better than carpet steamers for this particular job. The steam output is more controlled, and it’s much easier to direct right where it needs to go.
The timing part is probably the most critical part that almost everyone gets wrong. After the steam has done its job on that area, you have approximately 10 seconds to work with the softened adhesive – that’s the perfect window when everything gets pliable enough to smooth out properly. Wait any longer than that, and the adhesive hardens right back up again. Rush through it, and you could easily damage the film past the point of repair.
It’s especially helpful when you have bubbles near those defrost lines on the rear windows. Those particular areas are nearly impossible to fix with other methods since you can’t get decent access to work on them. Steam can reach those hard-to-reach places where your hands and tools just can’t go.
Signs That Your Tint Needs Replacement
Window tint doesn’t last forever, and when it finally goes bad, the signs are pretty hard to miss. That purple tinge that slowly spreads across your windows is the dead giveaway, and this usually shows up right alongside those bubbles. What’s actually happening is that the years of UV exposure have completely destroyed the adhesive layer. At this stage, no amount of heat gun work or squeegee pressure is going to save it.
The size of the bubbles tells you plenty about what you have. Small ones could be fixable. But once they grow past about 2 inches in diameter, you have serious adhesive failure on your hands. The real problem goes much deeper than just the visible bubble on the surface. You could try a repair if you wanted to waste an afternoon. The adhesive has already lost its grip, though, and it’s not coming back.
One pattern that shows up frequently is when someone fixes a bubble and then watches it reappear just a few days later. You smooth it out on Monday, and by Friday morning, it’s back in the exact same place. This sort of quick bubble return is an obvious signal that your tint has hit its expiration date. Most quality window tint will give you 5 to 10 years of solid performance before these problems start showing up. The original quality that you invested in actually determines how many years you’ll get out of it.
Look at the edges of the bubbles next time you check them. Any crystallization patterns around the edges are bad news. Crusty or flaky formations where the bubble meets the undamaged tint mean the film itself has started to chemically degrade. The material breaks down at this molecular level and can’t be undone with any repair technique.
What’s really frustrating about severely damaged tint is that the repair attempts almost always backfire. All that scraping and heating leaves behind scratches, tears, and an even uglier mess than the original bubbles. Your windows will wind up looking way worse than if you’d just left them alone. At some point, replacement is the only sensible option.
How to Prevent Future Bubbles
The adhesive underneath your new tint takes about 3 full days to bond properly with the glass, so you definitely have to keep those windows rolled up during this time. Every time someone rolls down a window too early, they create these weak areas in the adhesive layer, and that’s right where bubbles start to form weeks or months later.
After your tint has had time to cure completely, the cleaning products you choose become a big thing in how long it lasts. Standard glass cleaners are actually pretty terrible for tinted windows because they have ammonia, and ammonia slowly eats away at the adhesive layer that holds everything in place. Ammonia-free cleaners are the way to go, or you can just mix up some water with a little bit of mild soap. It works just as well and costs practically nothing.
A professional installer shared an interesting observation with me about parking habits and tint lifespan. Cars that always park toward the east seem to develop bubble problems more frequently than others. The early morning sun hits those east-side windows at a particular angle that causes uneven heating in the adhesive layer. North or south-side parking spaces are much gentler on your tint over time, and the difference in lifespan can be pretty dramatic.
Ceramic coatings are a pretty new way to protect window tint, and they’re catching on fast with car owners everywhere. After the tint cures completely, a technician applies this protective coating right on top of it. The results speak for themselves – cars with ceramic-coated tint typically last 30-40% longer than cars without it.
Temperature plays a bigger role in tint installation and repair. The summer heat speeds up the curing process, though extremely hot weather can cause its own set of problems. Winter installations need more patience since cold weather slows down the adhesive curing. But if you can keep your car in a heated garage during those first few days, you’ll tend to see fewer immediate bubble problems than with summer installations.
Transform Your View with Professional Tinting
These repair techniques are worth the time to learn because they can save you a decent amount of money and also help you develop a better sense of how window tint actually works and wears over time. Maybe you won’t get rid of every bubble in your first attempt. But even partial success means your windows will look much better than they did before, and you’ve likely extended the working life of your tint by a few years. You’ll also develop an eye for problems as they start to develop early on and can address minor issues long before they become expensive repairs.
Professional window work has been our specialty at OC Tint Shop for years now, and we take pride in the way we help protect your car, your home, and everything that matters to you day-to-day. Orange County residents have been coming to us for their tinting needs for a long time, and at this point, we’ve done professional installations on thousands of vehicles. We work with customers from Newport Beach all the way to Anaheim, and we only use premium materials with installation techniques that actually stop those bubbles from appearing later on.
Whether you need less heat and glare when you drive around town, want to protect your home’s furniture and flooring from UV damage that happens over time, or you’re interested in ways to improve privacy and energy efficiency at your office, our experienced technicians know just how to get you the flawless results you’re after. You can schedule a free consultation with OC Tint Shop anytime to learn about everything we do – automotive window tinting, residential films, ceramic coatings, paint protection services, and other services.
Our gallery shows the level of craftsmanship that’s made us Orange County’s preferred choice for window tinting and protection services.